Automatic Storage Management/ASM Part 2

Templates:

Templates are named groups of attributes that can be applied to the files within a disk group

Examples :


-- Create a new template.
ALTER DISKGROUP disk_group_1 ADD TEMPLATE my_template ATTRIBUTES (MIRROR FINE);

-- Modify template.
ALTER DISKGROUP disk_group_1 ALTER TEMPLATE my_template ATTRIBUTES (COARSE);

-- Drop template.
ALTER DISKGROUP disk_group_1 DROP TEMPLATE my_template;

Available attributes include:

  • UNPROTECTED – No mirroring or striping regardless of the redundancy setting.
  • MIRROR – Two-way mirroring for normal redundancy and three-way mirroring for high redundancy. This attribute cannot be set for external redundancy.
  • COARSE – Specifies lower granuality for striping. This attribute cannot be set for external redundancy.
  • FINE – Specifies higher granularity for striping. This attribute cannot be set for external redundancy.


Directories

A directory heirarchy can be defined using the ALTER DISKGROUP statement to support ASM file aliasing

Examples :

-- Create a directory.
ALTER DISKGROUP disk_group_1 ADD DIRECTORY '+disk_group_1/my_dir';

-- Rename a directory.
ALTER DISKGROUP disk_group_1 RENAME DIRECTORY '+disk_group_1/my_dir' TO '+disk_group_1/my_dir_2';

-- Delete a directory and all its contents.
ALTER DISKGROUP disk_group_1 DROP DIRECTORY '+disk_group_1/my_dir_2' FORCE;


Aliases

Aliases allow you to reference ASM files using user-friendly names

-- Create an alias using the fully qualified filename.
ALTER DISKGROUP disk_group_1 ADD ALIAS '+disk_group_1/my_dir/my_file.dbf'
FOR '+disk_group_1/mydb/datafile/my_ts.342.3';

-- Create an alias using the numeric form filename.
ALTER DISKGROUP disk_group_1 ADD ALIAS '+disk_group_1/my_dir/my_file.dbf'
FOR '+disk_group_1.342.3';

-- Rename an alias.
ALTER DISKGROUP disk_group_1 RENAME ALIAS '+disk_group_1/my_dir/my_file.dbf'
TO '+disk_group_1/my_dir/my_file2.dbf';

-- Delete an alias.
ALTER DISKGROUP disk_group_1 DELETE ALIAS

Files

Files are not deleted automatically if they are created using aliases, as they are not Oracle Managed Files (OMF), or if a recovery is done to a point-in-time before the file was created. For these circumstances it is necessary to manually delete the files, as shown below.


-- Drop file using an alias.
ALTER DISKGROUP disk_group_1 DROP FILE '+disk_group_1/my_dir/my_file.dbf';

-- Drop file using a numeric form filename.
ALTER DISKGROUP disk_group_1 DROP FILE '+disk_group_1.342.3';

-- Drop file using a fully qualified filename.
ALTER DISKGROUP disk_group_1 DROP FILE '+disk_group_1/mydb/datafile/my_ts.342.3';

ASM Views:

Migrating to ASM Using RMAN:

  • Disable change tracking (only available in Enterprise Edition) if it is currently being used.
SQL> ALTER DATABASE DISABLE BLOCK CHANGE TRACKING;
  • Shutdown the database.
    SQL> SHUTDOWN IMMEDIATE 
    • Modify the parameter file of the target database as follows:
      Set the DB_CREATE_FILE_DEST and DB_CREATE_ONLINE_LOG_DEST_n parameters to the relevant ASM disk groups.
      Remove the CONTROL_FILES parameter from the spfile so the control files will be moved to the DB_CREATE_* destination and the spfile gets updated automatically. If you are using a pfile the CONTROL_FILES parameter must be set to the appropriate ASM files or aliases.
  • Start the database in nomount mode.

                            RMAN> STARTUP NOMOUNT


  • Restore the controlfile into the new location from the old location.

 RMAN> RESTORE CONTROLFILE FROM ‘old_control_file_name’;

  • Mount the database.
  • Copy the database into the ASM disk group.
    RMAN> BACKUP AS COPY DATABASE FORMAT '+disk_group';

  • Switch all datafile to the new ASM location.

    RMAN> SWITCH DATABASE TO COPY;
  • Open the database.

    RMAN> ALTER DATABASE OPEN;
  • Create new redo logs in ASM and delete the old ones.
  • Enable change tracking if it was being used.

    SQL> ALTER DATABASE ENABLE BLOCK CHANGE TRACKING; 

rman-06054 media recovery requesting

RMAN-00571: ===========================================================
RMAN-00569: =============== ERROR MESSAGE STACK FOLLOWS ===============
RMAN-00571: ===========================================================
RMAN-03002: failure of recover command at 02/13/2011 14:51:58
RMAN-06054: media recovery requesting unknown log: thread 1 seq 2 lowscn 547146
 
 
This Error Happened Sometimes When you try to restore rman backup from Real Application
Cluster To single Node 
 
Solution  

 RMAN > recover database noredo;
 

Thank you
Osama mustafa
 
 
Hope This is useful . 

RMAN-10003 ORA-12154

RMAN-00571: ===========================================================
RMAN-00569: =============== ERROR MESSAGE STACK FOLLOWS ===============
RMAN-00571: ===========================================================
RMAN-03002: failure of restore command at 02/15/2011 12:54:22
RMAN-12001: could not open channel ORA_DISK_1
RMAN-10008: could not create channel context
RMAN-10003: unable to connect to target database
ORA-12154: TNS:could not resolve the connect identifier specified

Solution :

RMAN> run {
2> allocate channel ch00 type disk;
3> restore database;
4>}

Thank You
osama Mustafa

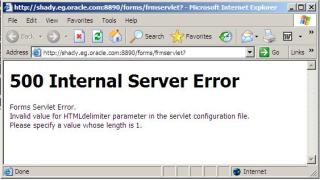
500 Internal Server Error / Oracle Application Server

There’s more than One Reason For this i will provide you with two solutions (Meta-link Note):

Solution One : 

1. Backup and edit the forms configuration file (Default= formsweb.cfg)
2. Modify the HTMLdelimiter to have only one character as a value 

HTMLdelimiter=%

3. Save and exit the file.

Solution Two :

Edit oracle_apache.conf and comment out the include related to the forms.conf  as the following :

# Oracle Forms Developer
#include “/oas/product/oas2/forms/server/forms.conf”

Thank You
osama mustafa

RAID PRINCIPLE

RAID : Redundant Array of Inexpensive (Independent) Disks

RAID TYPE :

  • RAID 0
  • RAID 1
  • RAID 5
  • RAID 10 (also known as RAID 1+0)

RAID LEVEL 0


  Following are the key points to remember for RAID level 0.

  • Minimum 2 disks.
  • Excellent performance ( as blocks are striped ).
  • No redundancy ( no mirror, no parity ).
  • Don’t use this for any critical system.

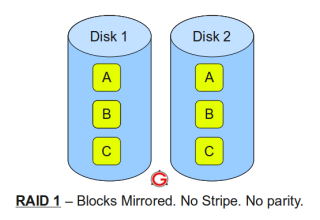
RAID LEVEL 1


Following are the key points to remember for RAID level 1.

  • Minimum 2 disks.
  • Good performance ( no striping. no parity ).
  • Excellent redundancy ( as blocks are mirrored ).


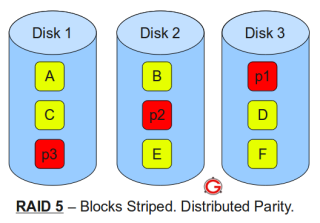
RAID LEVEL 5

 Following are the key points to remember for RAID level 5.

  • Minimum 3 disks.
  • Good performance ( as blocks are striped ).
  • Good redundancy ( distributed parity ).
  • Best cost effective option providing both performance and redundancy. Use this for DB that is heavily read oriented. Write operations will be slow.

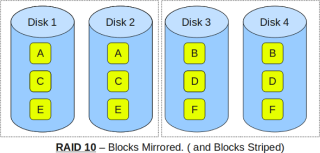
RAID LEVEL 10


 Following are the key points to remember for RAID level 10. 

  • Minimum 4 disks.
  • This is also called as “stripe of mirrors”
  • Excellent redundancy ( as blocks are mirrored )
  • Excellent performance ( as blocks are striped )
  • If you can afford the dollar, this is the BEST option for any mission critical applications (especially databases).


IMP-00003 With ORA-03113/ORA-03114

Error

“IMP-00003: ORACLE error 3113 encountered, ORA-03113: end-of-file on communication channel”
 OR
“IMP-00003: ORACLE error 3114 encountered, ORA-03114: not connected to ORACLE”

Cause

 database corruption or deletion of any critical files from the Oracle database which further makes the data stored in the database inaccessible , this error can appear on any platform .

Solution

  • Login as “sys” in SQLPLUS and run the below Sqls.
  • $OH/rdbms/admin/prvtread.plb.
  • $OH/rdbms/admin/dbmsread.sql.

Retry Your Import .

Thank you
Osama Mustafa.

Automatic Storage Management (ASM) / Part 1

using SQL*Plus connect to the idle instance.

export ORACLE_SID=+ASM
sqlplus / as sysdba

Startup and Shutdown of ASM Instances


ASM instance are started and stopped in a similar way to normal database instances. The options for the STARTUP command are:

  • FORCE – Performs a SHUTDOWN ABORT before restarting the ASM instance.
  • MOUNT – Starts the ASM instance and mounts the disk groups specified by the ASM_DISKGROUPS parameter.
  • NOMOUNT – Starts the ASM instance without mounting any disk groups.
  • OPEN – This is not a valid option for an ASM instance.

The options for the SHUTDOWN command are:

  • NORMAL – The ASM instance waits for all connected ASM instances and SQL sessions to exit then shuts down.
  • IMMEDIATE – The ASM instance waits for any SQL transactions to complete then shuts down. It doesn’t wait for sessions to exit.
  • TRANSACTIONAL – Same as IMMEDIATE.
  • ABORT – The ASM instance shuts down instantly.


ASM Disk Groups

  level of redundancy:


  • NORMAL REDUNDANCY – Two-way mirroring, requiring two failure groups.
  • HIGH REDUNDANCY – Three-way mirroring, requiring three failure groups.
  • EXTERNAL REDUNDANCY – No mirroring for disks that are already protected using hardware mirroring or RAID. If you have hardware RAID it should be used in preference to ASM redundancy, so this will be the standard option for most installations.

Create Example : 

CREATE DISKGROUP disk_group_1 NORMAL REDUNDANCY
FAILGROUP failure_group_1 DISK
'/devices/diska1' NAME diska1,
'/devices/diska2' NAME diska2
FAILGROUP failure_group_2 DISK
'/devices/diskb1' NAME diskb1,
'/devices/diskb2' NAME diskb2;

DROP Example : 

DROP DISKGROUP disk_group_1 INCLUDING CONTENTS;

Using Alter to Add Disk : 

ALTER DISKGROUP disk_group_1 ADD DISK
'/devices/disk*3',
'/devices/disk*4';

Using Alter to Drop Disk :

ALTER DISKGROUP disk_group_1 DROP DISK diska2;

Using Alter to Re-size Disk : 

ALTER DISKGROUP disk_group_1
RESIZE DISK diska1 SIZE 100G;

 Using Alter to Re-size all disk in Failure Group:

ALTER DISKGROUP disk_group_1
RESIZE DISKS IN FAILGROUP failure_group_1 SIZE 100G;

 Using Alter to Resize all Disk In DiskGroup :

ALTER DISKGROUP disk_group_1
RESIZE ALL SIZE 100G;

Using Alter To dismiss pending disk to be Dropped :

ALTER DISKGROUP disk_group_1 UNDROP DISKS;

 Some Useful Command to Mount ASM disk group Manually : 

ALTER DISKGROUP ALL DISMOUNT;
ALTER DISKGROUP ALL MOUNT;
ALTER DISKGROUP disk_group_1 DISMOUNT;
ALTER DISKGROUP disk_group_1 MOUNT;

 Thank You 

Osama mustafa

Changing Archive Log Destination

Today I am Gonna Show you How to change Archive log Destination in Two Ways :

1.Temporarily Changing the Destination Using SQL*Plus

sqlplus / as sysdba

sql> archive log list;

Database log mode Archive Mode
Automatic archival Enabled
Archive destination /u01/app/oracle/product/10.2.0/db_1/dbs/arch
Oldest online log sequence 9285
Next log sequence to archive 9287
Current log sequence 9287

 To change the location

sql>ARCHIVE LOG START ‘/u01/arch’;

To Verify your changes:

sql> archive log list;
Database log mode Archive Mode
Automatic archival Enabled
Archive destination /oracle/arch
Oldest online log sequence 9285
Next log sequence to archive 9287
Current log sequence 9287

2-Permanently Changing the Destination Using SQL*Plus

sqlplus / as sysdba

ALTER SYSTEM SET log_archive_dest =’/oradata/arch’ scope=both;

To Verify your changes:

sql> archive log list;

Database log mode Archive Mode
Automatic archival Enabled
Archive destination /oracle/arch
Oldest online log sequence 9285
Next log sequence to archive 9287
Current log sequence 9287   

To change the size of archive log

SQL> alter system SET DB_RECOVERY_FILE_DEST_SIZE = 10G SCOPE=BOTH SID=’orcl’;

System altered. 

Thank You
Osama Mustafa


ORA-16018 ORA-16019

Cause : 
These two errors come whenever LOG_ARCHIVE_DEST is set as archival location and you want to set DB_RECOVERY_FILE_DEST

Solution : 

1- You need to see Archive log destination First .

SQL > archive log list ; 

Database log mode Archive Mode
Automatic archival Enabled
Archive destination USE_DB_RECOVERY_FILE_DEST
Oldest online log sequence 215
Next log sequence to archive 217
Current log sequence 217

2-You Can Check Archive Location  By Check Database Parameter

SQL> show parameter DB_RECOVERY_FILE_DEST

NAME TYPE VALUE
———————————— ———– ——————————
db_recovery_file_dest string /oradata
 db_recovery_file_dest_size big integer 10G

 3-Set New Archive Log Location

SQL> alter system set log_archive_dest=’/u01′;

alter system set log_archive_dest=’/u01′
*
ERROR at line 1:
ORA-02097: parameter cannot be modified because specified value is invalid
ORA-16018: cannot use LOG_ARCHIVE_DEST with LOG_ARCHIVE_DEST_n or
DB_RECOVERY_FILE_DEST

4- If you want to set log_archive_dest first reset DB_RECOVERY_FILE_DEST and then set .

SQL> alter system set DB_RECOVERY_FILE_DEST=”;

System altered.

SQL> alter system set log_archive_dest=’/u01′;

System altered.

 SQL> archive log list

Database log mode Archive Mode
Automatic archival Enabled
Archive destination /u01

Oldest online log sequence 215
Next log sequence to archive 217
Current log sequence 217

5-Also if you now want to set DB_RECOVERY_FILE_DEST ORA-16019: will occur.

SQL> alter system set DB_RECOVERY_FILE_DEST=’/u02′;

alter system set DB_RECOVERY_FILE_DEST=’/u02′
*
ERROR at line 1:
ORA-02097: parameter cannot be modified because specified value is invalid
ORA-16019: cannot use db_recovery_file_dest with LOG_ARCHIVE_DEST or
LOG_ARCHIVE_DUPLEX_DEST

 6-To set DB_RECOVERY_FILE_DEST first reset LOG_ARCHIVE_DEST.

SQL> alter system set log_archive_dest=”;

System altered.

SQL> alter system set DB_RECOVERY_FILE_DEST=’/u02′;

System altered.

 SQL> archive log list
Database log mode Archive Mode
Automatic archival Enabled
Archive destination USE_DB_RECOVERY_FILE_DEST
Oldest online log sequence 215
Next log sequence to archive 217
Current log sequence 217

To set multiple location of archival destination set another log_archive_dest_n parameter like,
SQL> alter system set log_archive_dest_3=’LOCATION=/u02′;
System altered.

Thank you
Osama mustafa
 

Remove Node From Oracle Rac 10g ( Part-2)

 Remove Node From The Database :  ( From The Node You want to Delete) 


**Before You Start Deleting Node From Database You need To update inventory by :

./runInstallerupdateNodeList ORACLE_HOME=<Database home> “CLUSTER_NODES=<node to be removed>” –local

After Perform This You can Start De-install Process Like The Following : 

 You now need to update the corresponding  inventory on the remaining nodes. You can use the following command from the first node:
./runInstallerupdateNodeList ORACLE_HOME=<Database home> “CLUSTER_NODES=<remaining nodes>”

Remove Node From ASM : 

maybe some of us will be conflict with the above steps , I Above Step we Remove ASM from Node that we want to delete But ASM still exists , And On Remaining Node The Deleted Node For ASM still exists So We Need To update the ASM to Delete  Like The Following :

Update Inventory From Node We Want delete : 

./runInstallerupdateNodeList ORACLE_HOME=<ASM home> “CLUSTER_NODES=<node to be removed>” –local

 
update the corresponding inventory on the remaining nodes. You can use the following command from the first node:
./runInstallerupdateNodeList ORACLE_HOME=<ASM home> “CLUSTER_NODES=<remaining nodes>”

Remove Node From Oracle Clusterware From The First Node Do the Below Steps : 


1-Run This Command :

<Oracle Clusterware home>/bin/racgons remove_config <Node to be removed>:6200 
**6200 : Can Be Changed, And Its Called Remote Port 

<Oracle Clusterware home>/opmn/conf/ons.config 


2-From The Node You want To remove as root User : 

<Oracle Clusterwarehome>/install/rootdelete.sh

3-From The First Node as Root User : 

<Oracle Clusterware home>/bin/olsnodes –n
Then 
<Oracle Clusterware home>/install/rootdeletenode.sh <node name to be deleted>,<node number to be deleted>.


Remove Node From Oracle Cluster-ware (From The Node You want to be Delete)


To Update Inventory Run The Following Command : 


<Oracle Clusterwarehome>/oui/bin/runInstaller  –updateNodeList ORACLE_HOME=<Oracle Clusterwarehome>  “CLUSTER_NODES=<Node to be deleted>”   CRS=TRUE -local

Run Installer — > De-install 

From The First Node after Finish The De-install :
<Oracle Clusterwarehome>/oui/bin/runInstallerupdateNodeList  ORACLE_HOME=<Oracle Clusterware home>  “CLUSTER_NODES=<Remaining nodes>” CRS=TRUE
 Now You Are Delete The Node ..
To Check

 •srvctl  status nodeapps -n <Deleted node>should get a message saying Invalid node.
crs_stat | grep -i <Deleted node>should not get any output.
olsnodes –n should get all the present nodes list without the deleted node.
Thank You
Osama  Mustafa